Tongyi-MAI’s Z-Image brings undistilled, high-quality text-to-image generation to your local machine. Here’s everything you need to know about this impressive new model and how to get started in minutes.
🎨 What is Z-Image?
Released in late 2024 by Alibaba’s Tongyi-MAI team, Z-Image (造相) is a state-of-the-art diffusion transformer model that’s making waves in the AI art community. Unlike many recent models that prioritize speed through distillation, Z-Image is an undistilled foundation model that preserves the complete training signal—giving you maximum creative control and output quality just released yesterday!
“Z-Image is engineered for good quality, robust generative diversity, broad stylistic coverage, and precise prompt adherence.”— Z-Image Team, Tongyi-MAI
Why Z-Image Stands Out
In a landscape dominated by speed-optimized models, Z-Image takes a different approach. It’s built for creators, researchers, and developers who need:
- ✅ Full CFG Support – Complete Classifier-Free Guidance for precise control
- ✅ High Output Diversity – Significantly more variation across seeds and compositions
- ✅ Powerful Negative Prompts – Reliably suppress artifacts and unwanted elements
- ✅ Fine-tuning Ready – Perfect base for LoRA, ControlNet, and custom training
- ✅ Aesthetic Versatility – Masters photorealism, anime, digital art, and illustration
🆚 Z-Image vs Z-Image-Turbo: Which One?
Tongyi-MAI offers two models in the Z-Image family. Here’s how they compare:
| Feature | Z-Image | Z-Image-Turbo |
|---|---|---|
| CFG Support | ✅ Full support | ❌ Not available |
| Inference Steps | 28-50 steps | 8 steps |
| Fine-tuning | ✅ Excellent base | ❌ Not recommended |
| Negative Prompts | ✅ Powerful control | ❌ Limited |
| Output Diversity | High | Lower |
| Visual Quality | High | Very High |
| Speed | 10-30 seconds | 3-8 seconds |
| Best For | Development, research, precise control | Quick generation, production |
Bottom line: Choose Z-Image for maximum flexibility and creative control. Choose Turbo for speed when you need rapid iterations.
🚀 Getting Started: Installation Guide
I’ve created a complete setup package that makes installing and using Z-Image incredibly simple. Here’s how to get up and running in under 10 minutes.
Prerequisites
System Requirements: • Python 3.10 or newer • CUDA-capable GPU (12GB+ VRAM recommended) • 20GB free disk space for the model • Windows, Linux, or macOS
Step 1: Download the Installation Package
The package includes four essential files:
download_z_image.bat– Automated model downloaderz_image_gradio.py– Advanced web interfacerequirements.txt– Python dependenciesREADME.md– Complete documentation
https://mega.nz/file/xYVx3RwS#4h2SZ-RkPbKbl-_PwXuwX5llB3C0_oao06ynbunNecE
Step 2: Install Dependencies
Open your terminal or command prompt and navigate to the folder where you extracted the files. Then run:
# Using uv (recommended - faster)
uv pip install -r requirements.txt

# Or using standard pip
pip install -r requirements.txt

# Install latest diffusers for Z-Image support
pip install git+https://github.com/huggingface/diffusers
💡 Pro Tip: If you’re using uv, the installation will be significantly faster. If you don’t have it, install with: pip install uv
Step 3: Download the Model
Simply double-click download_z_image.bat or run it from the terminal:
download_z_image.batThe script will:
- Check for the HuggingFace CLI (installs it if needed)
- Create a
models/Z-Image/directory - Download all model files with progress tracking
- Confirm successful installation
Note: The download is approximately 15GB, so grab a coffee! ☕
Step 4: Launch the Interface
Start the Gradio web interface:
python z_image_gradio.pyThe interface will launch at http://localhost:7860. Open this URL in your browser, and you’re ready to create!
🎨 Using the Z-Image Interface
The Gradio interface I’ve built gives you professional-grade control over every aspect of image generation. Let’s break down the key features.
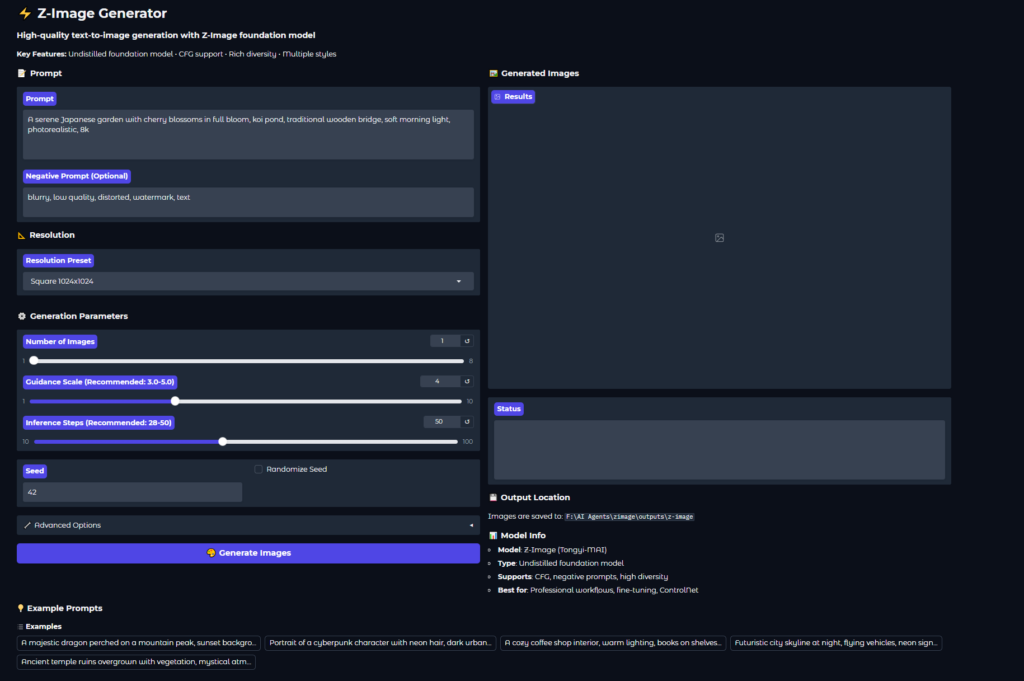
1. Prompting System
Z-Image supports both English and Chinese prompts. The model excels with detailed, descriptive prompts that specify:
- Subject: What you want to see
- Style: Photorealistic, anime, oil painting, concept art, etc.
- Composition: Camera angle, framing, focus
- Lighting: Soft morning light, dramatic shadows, neon glow
- Quality tags: 8k, highly detailed, professional, cinematic
Example Prompt:
A serene Japanese garden with cherry blossoms in full bloom,
traditional wooden bridge over koi pond, stone lanterns,
soft morning light filtering through trees,
photorealistic, 8k, professional photography,
peaceful atmosphere, shallow depth of field
2. Negative Prompts – Your Secret Weapon
One of Z-Image’s strongest features is its responsive negative prompting. Use it to avoid common issues:
blurry, low quality, distorted, deformed,
watermark, text, signature,
oversaturated, overexposed
For specific styles, you can be more targeted:
- For photorealism: “cartoon, anime, painting, illustration, sketch”
- For anime/art: “photorealistic, 3d render, realistic photo”
3. Resolution Control
Choose from nine preset resolutions or go custom:
Square Formats
- 512×512 (testing)
- 768×768 (balanced)
- 1024×1024 (standard)
Portrait
- 720×1280
- 768×1344
Landscape
- 1280×720
- 1920×1080
- 2048×1152
Maximum supported: 2048×2048 total pixel area (4.2 megapixels)
4. Generation Parameters
Guidance Scale (3.0-5.0 recommended)
Controls how closely the model follows your prompt:
- 3.0-3.5: More creative freedom, higher diversity
- 4.0-4.5: Balanced (recommended for most use cases)
- 4.5-5.0: Stronger prompt adherence, more literal interpretation
Inference Steps (28-50 recommended)
More steps generally mean better quality, but with diminishing returns:
- 28 steps: Minimum for quality results
- 35-40 steps: Sweet spot for speed/quality
- 50 steps: Maximum quality
Batch Generation
Generate 1-8 images at once. Perfect for:
- Exploring variations with different seeds
- A/B testing prompts
- Finding the perfect composition
5. Advanced Options
The interface includes professional features hidden in an expandable section:
- CFG Normalization: Alternative guidance behavior (experimental)
- CPU Offload: Reduce VRAM usage if you have memory constraints
- Save Metadata: Embed all generation parameters in PNG files + save JSON sidecars
💡 Pro Tips for Best Results
1. Start with Examples
The interface includes five curated example prompts. Use these as templates and modify them to match your vision.
2. Iterate Systematically
Don’t change everything at once. Try this workflow:
- Start with a basic prompt + default settings
- Refine the prompt for better subject description
- Add style and quality tags
- Use negative prompts to fix specific issues
- Adjust guidance scale if needed
3. Use Seeds Strategically
- Fixed seed: Reproduce or slightly modify successful images
- Randomized seed: Explore diverse compositions from the same prompt
- Seed increment: Batch generation automatically adds 1 to each seed
4. Resolution Matters
Higher resolution isn’t always better:
- 512-768px: Fast testing, style exploration
- 1024px: Balanced quality and speed
- 1280-2048px: Final high-quality renders
5. Leverage Metadata
With metadata saving enabled, you get:
- Parameters embedded in PNG files
- JSON sidecar files for easy reference
- Filename includes timestamp and seed
This makes it easy to recreate or modify successful generations later!
🎯 Recommended Settings by Use Case
For Photorealistic Images
Steps: 50
Guidance: 4.5-5.0
Resolution: 1280×720 or 1920×1080
Negative: cartoon, anime, painting, illustration
Quality tags: photorealistic, 8k, professional photography, sharp focus
For Anime/Illustration
Steps: 35-45
Guidance: 3.5-4.5
Resolution: 768×1344 or 1024×1024
Negative: photorealistic, 3d render, blurry
Style tags: anime style, cel shaded, digital art, vibrant colors
For Concept Art
Steps: 40-50
Guidance: 4.0-4.5
Resolution: 1280×720 or 2048×1152
Quality tags: concept art, highly detailed, cinematic lighting, matte painting
For Exploration/Diversity
Steps: 28-35
Guidance: 3.0-3.5
Batch: 4-8 images
Randomize Seed: ON
Try multiple variations to find interesting directions
🔧 Troubleshooting Common Issues
Out of Memory (OOM) Errors
Solution:
- Enable “CPU Offload” in Advanced Options
- Reduce resolution (try 768×768)
- Lower batch size to 1
- Close other GPU applications
Images Look Blurry or Low Quality
Solution:
- Increase steps to 50
- Add quality tags: “8k, highly detailed, sharp focus”
- Use negative prompts: “blurry, low quality, soft focus”
- Adjust guidance scale (try 4.0-4.5)
Results Don’t Match Prompt
Solution:
- Increase guidance scale (4.5-5.0)
- Make prompt more specific and detailed
- Use negative prompts to exclude unwanted elements
- Try more inference steps (45-50)
Model Loading Errors
Solution:
- Verify
models/Z-Image/folder exists and has files - Check internet connection (will auto-download if local not found)
- Ensure diffusers is up to date:
pip install -U diffusers - Check CUDA:
python -c "import torch; print(torch.cuda.is_available())"
📊 Performance Expectations
Here’s what you can expect on different hardware:
| GPU | Resolution | Steps | Time per Image |
|---|---|---|---|
| RTX 4090 | 1024×1024 | 50 | 10-15 seconds |
| RTX 4080 | 1024×1024 | 50 | 15-20 seconds |
| RTX 3090 | 1024×1024 | 50 | 20-25 seconds |
| RTX 3080 | 768×768 | 35 | 15-20 seconds |
🎓 Learning Resources
🚀 What’s Next?
Now that you have Z-Image running, here are some exciting directions to explore:
1. Fine-tune with LoRA
Z-Image’s undistilled nature makes it an excellent base for LoRA training. Train custom styles, characters, or concepts on your own data. You can also use in Comfyui already trained Z-image-Turbo Loras.
2. ControlNet Integration
Add structural conditioning with ControlNet for precise pose control, edge guidance, or depth-based composition.
3. Prompt Engineering
Experiment with different prompt structures, weighting techniques, and negative prompt strategies to develop your signature style.
4. Workflow Automation
The Python interface can be easily integrated into larger workflows, batch processing pipelines, or custom applications.
🎉 Final Thoughts
Z-Image represents a thoughtful approach to AI image generation—prioritizing quality, control, and flexibility over pure speed. While models like Turbo variants are impressive for rapid iteration, Z-Image’s undistilled foundation gives you the precision and versatility needed for serious creative work.
The setup package I’ve created removes the usual friction of getting started with new AI models. Within minutes, you’ll have a professional-grade interface for exploring one of the most capable text-to-image models available.
Ready to dive in? Download the setup package and start creating. Share your results, experiment boldly, and discover what Z-Image can do for your creative workflow!
Quick Start Checklist
- ☐ Download the Z-Image setup package
- ☐ Install dependencies with
uv pip install -r requirements.txt - ☐ Run
download_z_image.batto get the model - ☐ Launch with
python z_image_gradio.py - ☐ Try the example prompts
- ☐ Generate your first masterpiece!
Have questions or want to share your Z-Image creations? Drop a comment below! I’d love to see what you create with this powerful model.